Hashnode is a great platform for building your tech blog. One of the best things with Hashnode is that it allows you to connect your blog to your very own custom domain and guess what, it is free. Moreover, the following features make Hasnode even more attractive:
- Free SSL certificate for your blog
- Custom pages
- Lots of customization options (custom CSS)
- Newsletter service
- Requests For Articles (RFA) - it helps to know what readers wants to read about
- Series - groups blog articles together
- Blog Analytics - looks a bit basic though
- 3rd Party Integrations (Google Analytics, Facebook Pixel, Hotjar, etc.)
- SEO
- Backup your articles to a Github repo
- Import your articles from other blogging platforms
- Hashnode sponsors (Commission-free at the time of writing this article)
So, excited? Let's get started.
The following steps will describe an initial setup of your Hashnode blogging account and connect it to your domain hosted on GoDaddy. The process can slightly differ for the domains hosted on other hosting platforms but I guess it should not be significantly different.
Step 1. To create an account on Hashnode, go to hashnode.com and click on Create an account button.
Step 2. Choose how you would like to register. I prefer to connect via Linkedin profile.
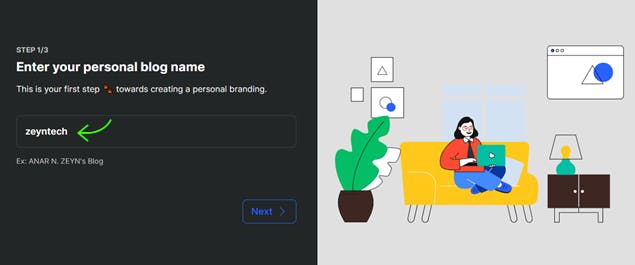
Step 3. The window below will appear that will take you through the process of creating your blog and connecting it to your domain hosted on GoDaddy. In this window, enter your personal blog name and click Next. I have an existing blog name and domain name for blogging, so I entered: zeyntech
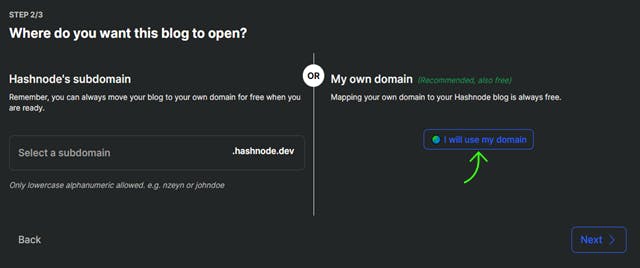
Step 4. In the next window, you need to specify a domain name for your blog. It offers two options (both are free) - you can either use Hasnode's subdomain or your own domain hosted elsewhere. The aim of this article is to connect your blog to a domain hosted on GoDaddy. Thus, you need to click on I will use my domain button.
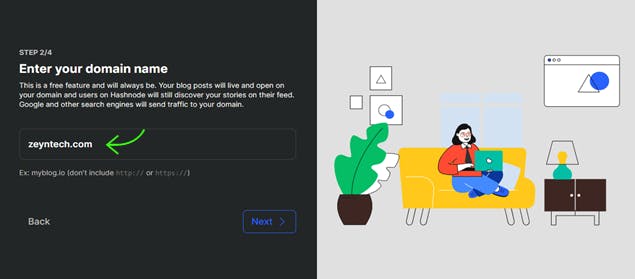
Step 5. Enter your domain name that is hosted on GoDaddy and press Next.
Step 6. You will need to map your domain hosted on GoDaddy to Hashnode as per the instructions shown in the below image:
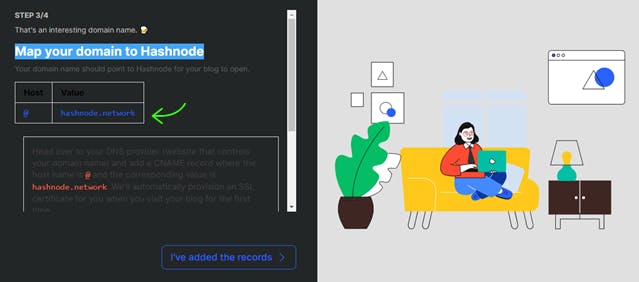
To map your domain to Hashnode, go to your domain registrar to update CNAME (preferred) or A record. In our case, we need to update it on the GoDaddy. Login to your GoDaddy account and go to My Products.
In the Domains section, click on the context menu button for the domain that you want to connect to Hashnode blog and navigate to Manage DNS.
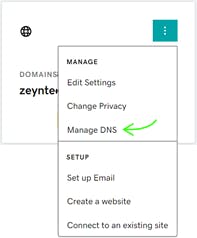
This will open DNS Records of your domain. You now need to update CNAME or A record. In case you don't know:
A - points a name to a specific IP address.
CNAME - points a name to another name instead of to an IP address.
If you provider supports CNAME flattening, then you can create CNAME at the root level.
In case of GoDaddy, they do not support CNAME flatenning and hence, with this approach, you will lose the benefits of Hansnode's global CDN and edge caching capabilities. Thus, we will point our A record at the root level to the Hashnode's IP address.
You should already have an A record in your records pointing to some value or just can be in the Parked state. Edit that A record to point to the Hashnode's IP address (76.76.21.21).

If you don't have an A record, you will need to create a new one by pressing Add button and providing the above mentioned details.
This change will take effect after some time. In my case, it took about 5 mins to update but it can take up to 24 hours as per Hashnode's documentation. So, be patient.
Step 7. Go back to the last Hashnode screen and click on I have added the records button.
Step 8. You can check if it has been updated by going to your Hashnode account, click on your profile icon and select Blog Dashboard. Click on Domain tab and you should see the results similar to the below image:
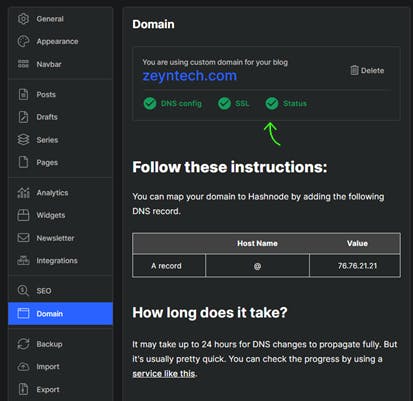
As you can see, it is ready to be used and Hashnode already provided SSL certificate for your domain.
Step 9. You can now browse to your domain name and it should end up in your hashnode home page.
Here you are! It's ready to go.
As a next step, you can consider customizing your blog profile before you start diving into writing. In case you would like to do so, you can follow the next article in this series.
Thanks for coming so far. This is my first blog post series on Hashnode, and I am planning to post more about my tech blog journey. If you are still here, why not connect with me on Twitter or Linkedin ?
