Hashnode is more than just a blogging platform. And your blog should be more than just a blog. It is a strong marketing tool that represents you, your brand. As you build more and more quality blog content, you turn your visitors to readers. Many readers get interested to know more about the authors, connect and engage with them. Thus, they may want to navigate to your profile page to learn more about you. Hence, your Hashnode profile page can play a great role in connecting and engaging with your audience.
Moreover, some companies and recruiters also visit your profile page to learn more about you, your area of expertise and potentially offer you an opportunity or partnership.
Regardless of whatever your reason is, a completed welcoming and engaging profile page will help you stay connected with the community, stand out, and open new horizons for you in your career. It is recommended to complete as much as details as you can and always keep it fresh.
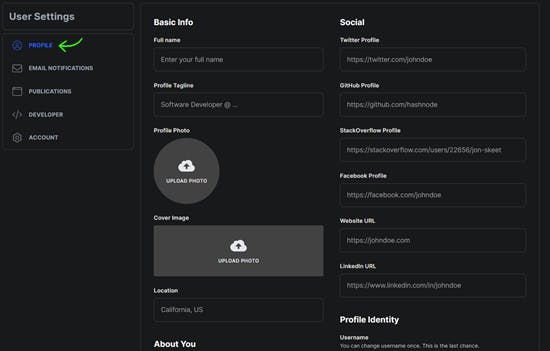
Now, we are clear why it is vital to have a completed profile page, let's have a look at the following steps below that shows main elements of the profile page that need to be completed or updated.
Step 1. Go to your Hashnode settings by clicking on your profile picture and then click on Account Settings or just browse to: hashnode.com/settings

Step 2. Update your profile information as much as possible under Basic Info section. It might be good to have the same full name format and profile photo so that people can recognize you easily across the other social platforms.
Step 3. Under Social section, add the links to your active social accounts and the link to your website so that your audience can easily find and connect with you on the other social platforms.
Step 4. Last but not least, add more information about you, your skills and what you do in the About You section.
Step 5. Once you are happy with your updates, press on Update button.
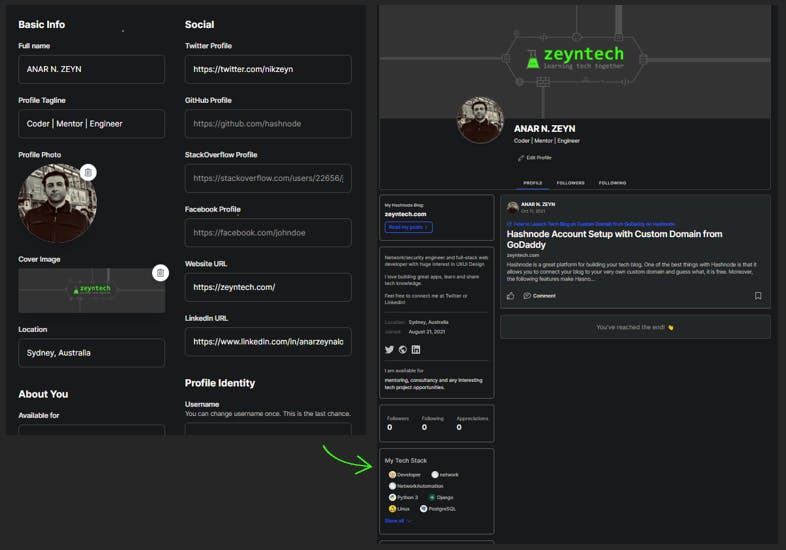
Step 6. To see what your profile page looks like after your updates to the profile settings, you can navigate to your profile page by clicking on your profile photo in your blog home page or following this link where the username is your Hashnode username: hashnode.com/@username
The screenshot below shows how each field maps to your public profile page:

Congrats! Your profile page should be complete now. The profile page settings have some similarities with the blog settings but they are not the same. You can customize your blog settings from Blog Dashboard and the next article in this series will be exactly about that.
So, whether as a reader or blogger, what are other reasons you'd like to have a complete profile page? I'd love to hear them. Let me know in the comments section below.
Thanks for coming so far. I am planning to post more about my tech blog journey. If you are still here, why not connect with me on Twitter or Linkedin ?
